本笔记的目的是学会基本的控制角色。入门示例成品。
创建Character蓝图类
创建C++类继承于Character。命名为AMainPlayer,创建对应的蓝图,命名为BP_MainPlayer。
创建相机旋臂,且设置旋臂长度为600。旋臂本身不旋转,仅旋转其子项。
SpringArm = CreateDefaultSubobject<USpringArmComponent>(TEXT("SpringArm"));
SpringArm->SetupAttachment(GetRootComponent());
// 默认旋臂长度
SpringArm->TargetArmLength = 600.0f;
创建跟随角色的相机,并绑定到旋臂上,成为旋臂子项。
FollowCamera = CreateDefaultSubobject<UCameraComponent>(TEXT("FollowCamera"));
FollowCamera->SetupAttachment(SpringArm, USpringArmComponent::SocketName);
控制相机旋转
设置旋臂使用Pawn控制旋转。旋臂在执行Pitch、Yaw、Roll时,相机能够沿着以旋臂长度为半径的球体表面,围绕着Pawn运动,并看向Pawn。
// 旋臂围绕着Pawn运动
SpringArm->bUsePawnControlRotation = true;
绑定鼠标的水平移动和垂直移动的轴操作映射。
PlayerInputComponent->BindAxis(TEXT("MouseYaw"), this, &AMainPlayer::MouseYaw);
PlayerInputComponent->BindAxis(TEXT("MousePitch"), this, &AMainPlayer::MousePitch);

void AMainPlayer::MouseYaw(float Value)
{
	// 这个函数每帧都会调用,也就是没有操作也会执行
	// Value为零就不用设置了,说明没有操作输入,节省性能
	if (FMath::IsNearlyZero(Value))
	{
		return;
	}
	AddControllerYawInput(Value);
}

void AMainPlayer::MousePitch(float Value)
{
	// 这个函数每帧都会调用,也就是没有操作也会执行
	// Value为零就不用设置了,说明没有操作输入,节省性能
	if (FMath::IsNearlyZero(Value))
	{
		return;
	}
	AddControllerPitchInput(Value);
}
如果想要角色朝向相机镜头Yaw方向,可以设置bUseControllerRotationYaw为true。当然如果是空战游戏,或者做角色飞行,需要角色Pitch和Roll也随着相机镜头改变,就可以设置bUseControllerRotationPitch和bUseControllerRotationRoll。这里我们角色转向所有轴向都不想要朝向相机方向。
// 角色所有轴向都不朝向相机朝向
bUseControllerRotationPitch = false;
bUseControllerRotationRoll = false;
bUseControllerRotationYaw = false;

// 角色朝向加速度方向
GetCharacterMovement()->bOrientRotationToMovement = true;
// 设置转身速度
GetCharacterMovement()->RotationRate = FRotator(0.0f, 500.0f, 0.0f);
如果三个bool值都设为true会出现以下诡异情景。
控制角色移动
绑定键盘W、A、S、D键的轴操作映射。
PlayerInputComponent->BindAxis(TEXT("MoveForwardBack"), this, &AMainPlayer::MoveForwardBack);
PlayerInputComponent->BindAxis(TEXT("MoveLeftRight"), this, &AMainPlayer::MoveLeftRight);

void AMainPlayer::MoveForwardBack(float Value)
{
	if (Controller == nullptr || FMath::IsNearlyZero(Value))
	{
		return;
	}
	// AddMovementInput只在Character类有效
	//AddMovementInput(GetActorForwardVector(), Value);

	// 按下按钮的时候就朝向Cotroller的方向
	//if (Value != 0.0f)
	//{
	//	GetMesh()->SetRelativeRotation(YawRotator);
	//}
	// 注释掉,可以使用GetCharacterMovement()->bOrientRotationToMovement来实现

	FRotator Rotator = Controller->GetControlRotation(); // 获取控制器的欧拉角
	FRotator YawRotator(0.0f, Rotator.Yaw, 0.0f); // 欧拉角转矩阵
	FVector Direction = FRotationMatrix(YawRotator).GetUnitAxis(EAxis::X); // 取矩阵的m_01,m_02,m_03,也就是Controller的Forward
	AddMovementInput(Direction, Value);
}

void AMainPlayer::MoveLeftRight(float Value)
{
	if (Controller == nullptr || FMath::IsNearlyZero(Value))
	{
		return;
	}
	// AddMovementInput只在Character类有效
	//AddMovementInput(GetActorRightVector(), Value);

	// 按下按钮的时候就朝向Cotroller的方向
	//if (Value != 0.0f)
	//{
	//	GetMesh()->SetRelativeRotation(YawRotator);
	//}
	// 注释掉,可以使用GetCharacterMovement()->bOrientRotationToMovement来实现

	FRotator Rotator = Controller->GetControlRotation(); // 获取控制器的欧拉角
	FRotator YawRotator(0.0f, Rotator.Yaw, 0.0f); // 欧拉角转矩阵
	//FVector Direction = FRotationMatrix(YawRotator).GetUnitAxis(EAxis::X); // 取矩阵的m_01,m_02,m_03,也就是Controller的Forward
	//Direction = FVector::CrossProduct(FVector::UpVector, Direction);

	FVector Direction = FRotationMatrix(YawRotator).GetUnitAxis(EAxis::Y); // 取矩阵的m_11,m_12,m_13,也就是Controller的Right

	AddMovementInput(Direction, Value);
}
控制跳跃
绑定键盘的Space键的按下和抬起事件。
PlayerInputComponent->BindAction(TEXT("Jump"), EInputEvent::IE_Pressed, this, &AMainPlayer::Jump);
PlayerInputComponent->BindAction(TEXT("Jump"), EInputEvent::IE_Released, this, &ACharacter::StopJumping);

void AMainPlayer::Jump()
{
	Super::Jump();
}
动画
新建BlendSpace
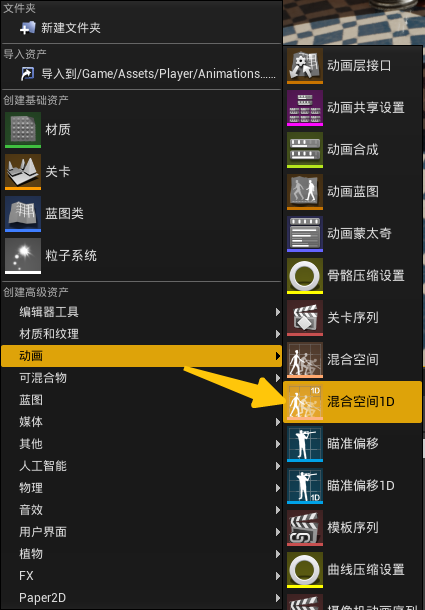
类似Unity的BlendTree的概念,不同的是UE4里BlendSpace作为一个资源存在在文件夹里。工作原理同样是根据某个参数,来混合动画。文件夹里想要创建BlendSpace的地方右键,如下图菜单选择创建。这里我们希望根据移动速度来差值Idle动画和Walk动画,所以创建一个1D的BlendSpace就可以了。命名为BS_Player_Movement。
双击打开BlendSpace的编辑窗口,按下图方式拖拽动画到插值轴的两端,即可设置BlendSpace的需要混合的两个动画了。
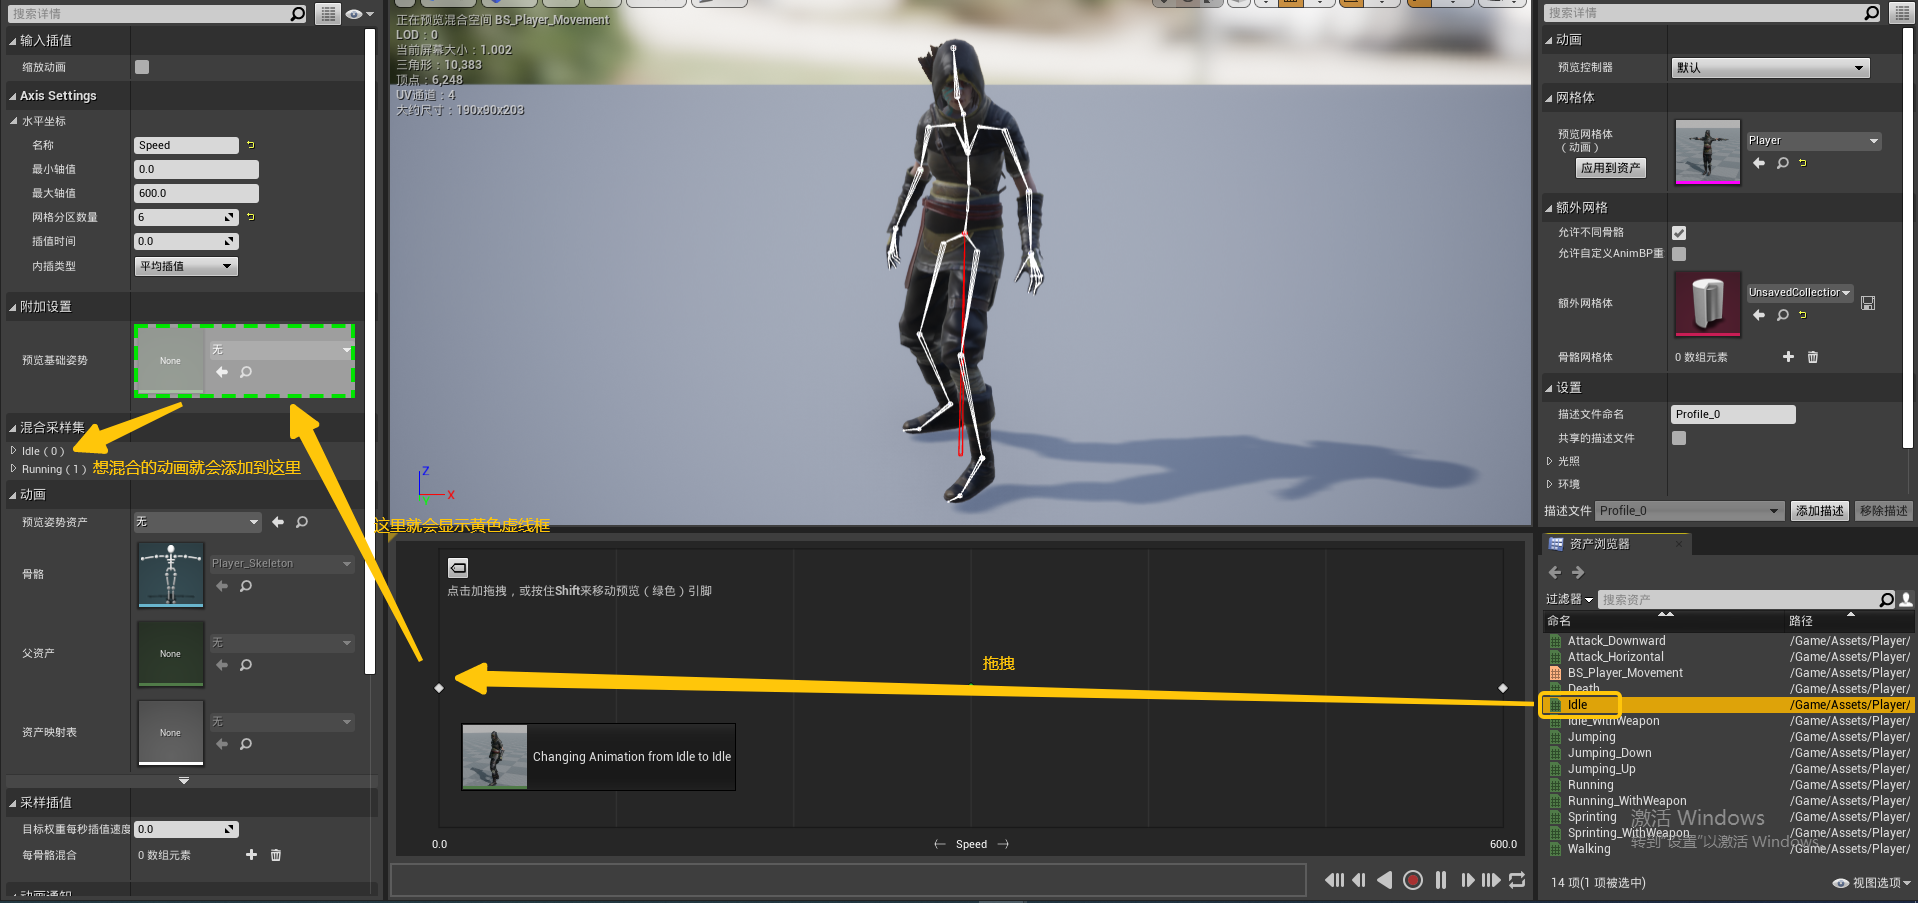
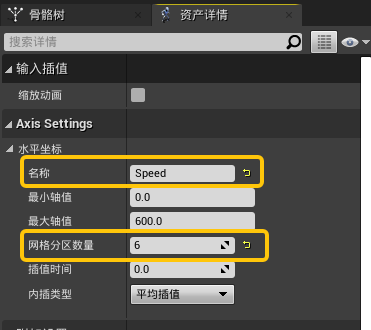
设置插值轴的名称,也就是靠什么参数来插值混合两个动画的,同时可以设置轴的分段数,也就是“网格分区数量”。
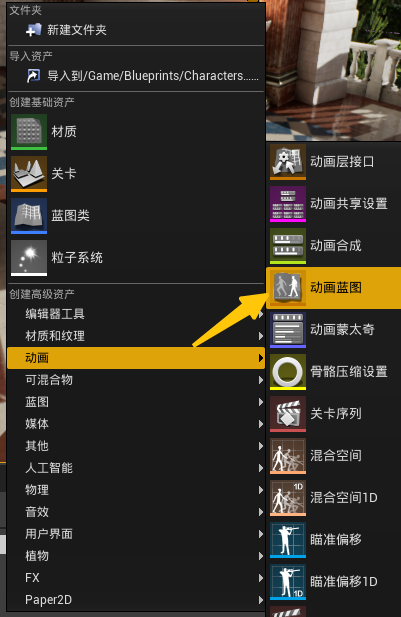
新建动画蓝图类
动画蓝图类都是继承于UAnimInstance的,所以新建一个类继承于UAnimInstance,用来取得其所属角色身上的移动速度信息和是否浮空信息,并在蓝图里使用。
UCLASS()
class TEST2_API UMainPlayerAnimInstance : public UAnimInstance
{
	GENERATED_BODY()

public:

	UPROPERTY(VisibleAnywhere, BlueprintReadOnly, Category = "Animation Properties")
	float Speed;

	UPROPERTY(VisibleAnywhere, BlueprintReadOnly, Category = "Animation Properties")
	bool bIsInAir;

	UPROPERTY(VisibleAnywhere, BlueprintReadOnly, Category = "Animation Properties")
	class AMainPlayer* PlayerRef;

public:
	// 继承于UAnimInstance的初始化方法
	virtual void NativeInitializeAnimation() override;

	// 每帧执行,用来获取所属角色的速度和浮空信息
	UFUNCTION(BlueprintCallable, Category = "Animation Properties")
	void UpdateAnimationProperties();
};

void UMainPlayerAnimInstance::NativeInitializeAnimation()
{
	PlayerRef = Cast<AMainPlayer>(TryGetPawnOwner());
}

void UMainPlayerAnimInstance::UpdateAnimationProperties()
{
	if (PlayerRef == nullptr)
	{
		PlayerRef = Cast<AMainPlayer>(TryGetPawnOwner());
	}
	if (PlayerRef == nullptr)
	{
		return;
	}

	FVector SpeedVector = PlayerRef->GetVelocity();
	FVector PlannarSpeed = FVector(SpeedVector.X, SpeedVector.Y, 0.0f);
	Speed = PlannarSpeed.Size();

	bIsInAir = PlayerRef->GetMovementComponent()->IsFalling();
}
主要添加了Speed和bIsInAir属性来保存玩家速度和浮空信息。用PlayerRef来保存所属角色的指针。
文件夹里右键创建动画蓝图类,继承于UMainPlayerAnimInstance,命名为ABP_MainPlayer。
编辑动画蓝图
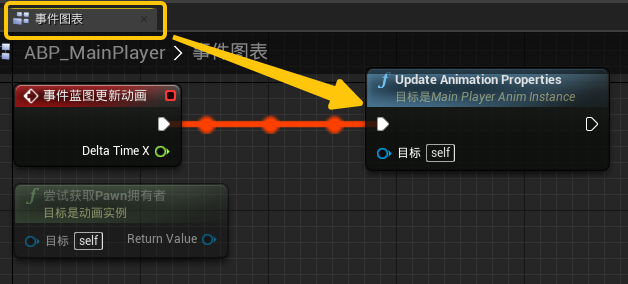
蓝图里设置每帧执行上文创建的UpdateAnimationProperties函数。
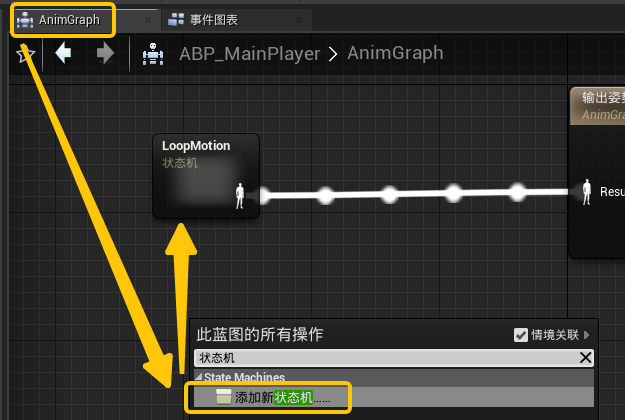
在AnimGraph里创建一个状态机,类似于Unity的Animator中的动画控制器一样的概念。
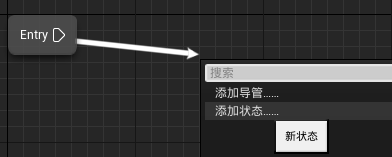
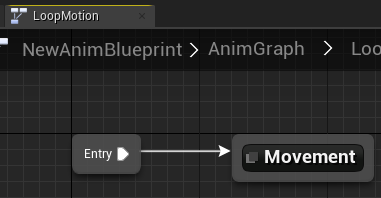
双击状态机,编辑状态机。状态机初始状态Entry类似于Unity中Animator的Any State的概念。从Entry连一条线,创建一个状态命名为Movement。
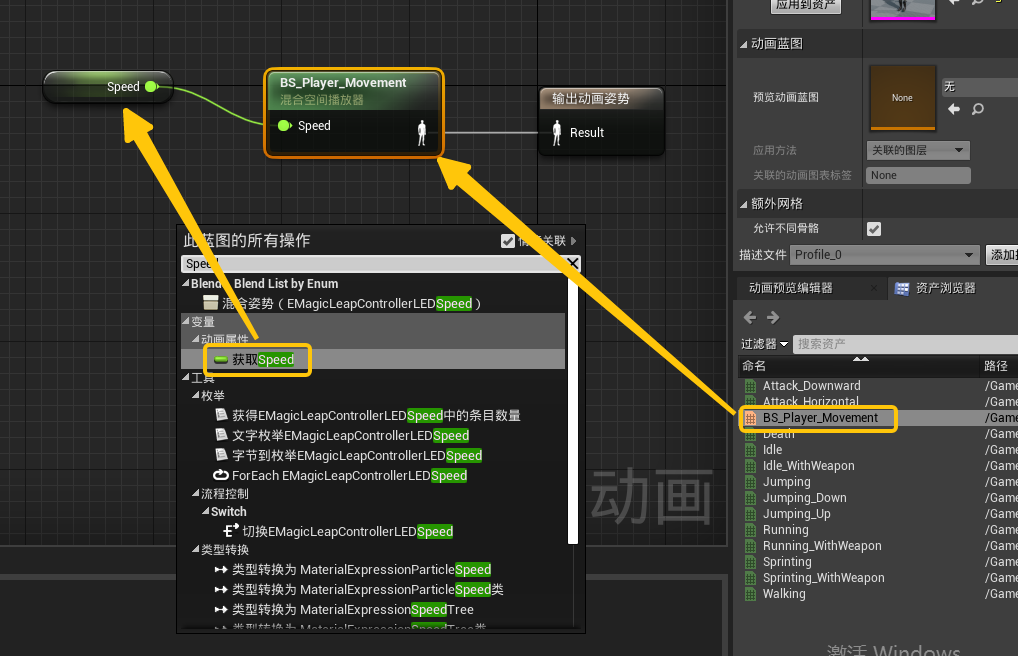
双击Movement状态,编辑状态。获取UpdateAnimationProperties类中的Speed属性作为BlendSpace的输入,来混合Idle和Walk动画。
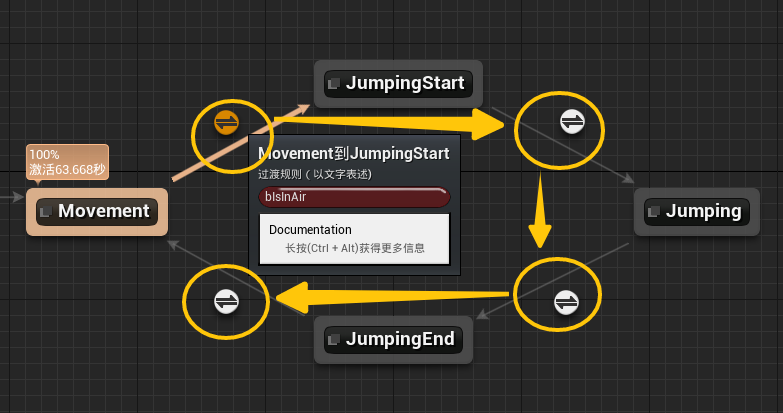
同理创建JumpingStart、Jumping和JumpingEnd三个状态。
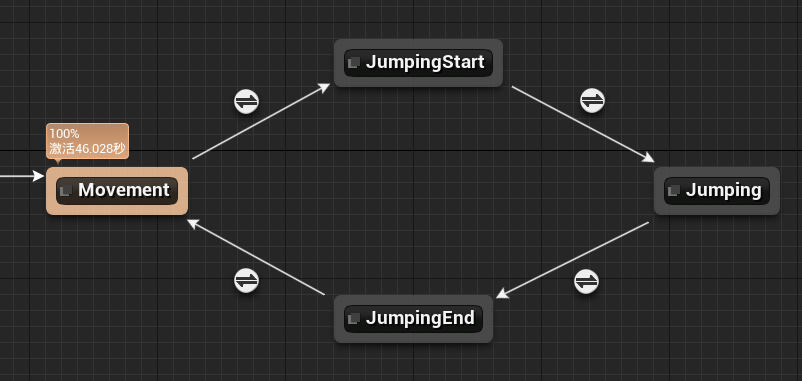
分别将Jumping_Up、Jumping和Jumping_Down三个动画拖入到JumpingStart、Jumping和JumpingEnd三个状态里。
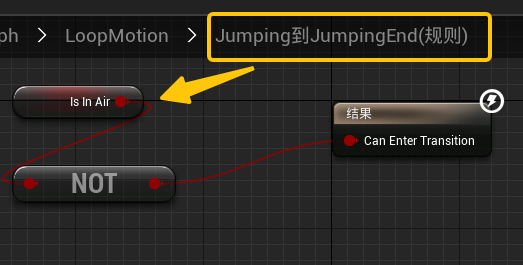
设置状态之间的跳转条件,例如Jumping到Jumping_End就是当bIsInAir为false时跳转。
至此动画蓝图编辑完成,点击动画蓝图的左上角“编译”和“保存”按钮完成动画蓝图的编辑。
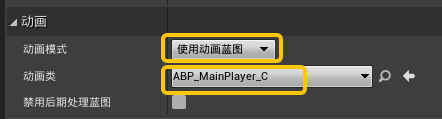
使用动画蓝图
打开角色蓝图BP_MainPlayer,选中“网格体”,“细节”窗口里找到动画设置,如下进行设置。